Shadowsocks with V2Ray Plugin for Windows and Android Clients
Domain
Take out a domain name, e.g. example.com.
Add A and/or AAAA DNS record(s) for server, e.g. my.example.com.
Add domain example.com to Cloudflare.
Set nameservers to Cloudflare nameservers.
Initially, set Cloudflare SSL/TLS Encryption mode Off.
Server
Nginx
These instructions are for Debian 10 logged in as root user.
apt update && apt upgrade -y
apt install wget zip unzip -y
wget https://github.com/arcdetri/sample-blog/archive/master.zip
unzip master.zip
cp -rf sample-blog-master/html/* /var/www/html/
Edit /etc/nginx/sites-available/default. Replace my.example.com with actual server name.
server {
listen 80 default_server;
listen [::]:80 default_server;
root /var/www/html;
index index.html;
server_name my.example.com;
location / {
try_files $uri $uri/ =404;
}
}
systemctl restart nginx
apt install certbot python-certbot-nginx -y
certbot --nginx
certbot renew --dry-run
Now you have Let's Encrypt certificate, set Cloudflare SSL/TLS Encryption mode Full.
V2Ray Plugin
wget https://github.com/shadowsocks/v2ray-plugin/releases/download/v1.3.1/v2ray-plugin-linux-amd64-v1.3.1.tar.gz
tar -xf v2ray-plugin-linux-amd64-v1.3.1.tar.gz
cp v2ray-plugin_linux_amd64 /usr/bin/v2ray-plugin
Shadowsocks-Libev
apt install shadowsocks-libev -y
Edit /etc/shadowsocks-libev/config.json. Choose something better than pass1234 and abc123.
{
"server":["::1","127.0.0.1"],
"server_port":10001,
"password":"pass1234",
"timeout":300,
"method":"chacha20-ietf-poly1305",
"plugin":"/usr/bin/v2ray-plugin",
"plugin_opts":"server;path=/abc123"
}
systemctl restart shadowsocks-libev
systemctl status shadowsocks-libev
netstat -tulpn
Edit /etc/nginx/sites-available/default. Add a location block within the server for port 443.
location /abc123 {
proxy_redirect off;
proxy_pass http://127.0.0.1:10001;
proxy_http_version 1.1;
proxy_set_header Upgrade $http_upgrade;
proxy_set_header Connection "upgrade";
proxy_set_header Host $http_host;
}
systemctl restart nginx
systemctl status nginx
Client
Windows Client
Download and extract Shadowsocks for Windows from https://github.com/shadowsocks/shadowsocks-windows.
Download and extract https://github.com/shadowsocks/v2ray-plugin and place in same folder as shadowsocks.exe.
- Server IP = my.example.com
- Server Port = 443
- Password = pass1234
- Encryption = chacha20-ietf-poly1305
- Plygin Program = v2ray-plugin_windows_amd64.exe
- Plugin Options = path=/abc123;host=my.example.com;tls
Android Client
Install Shadowsocks by Max Lv.
Install V2Ray Plugin by Max Lv.
Open Shadowsocks. Add a new profile.
- Profile Name = ss+v2ray
- Server = my.example.com
- Remote Port = 443
- Password = pass1234
- Encrypt Method = chacha20-ietf-poly1305
- Route = All
- IPv6 Route = On
- Apps VPN Mode = Off
- Metered Hint = Off
- Remote DNS = 8.8.8.8
- Send DNS over UDP = Off
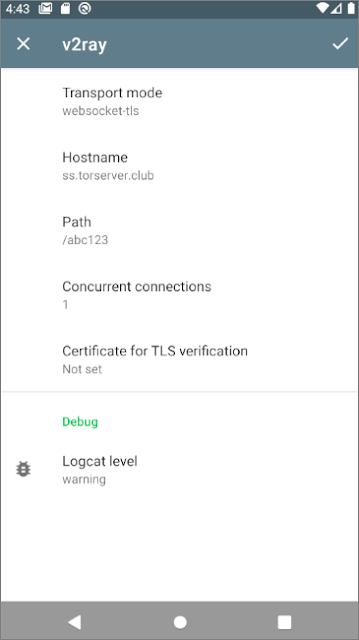
- Plugin = v2ray
- Transport mode = websocket-tls
- Hostname = my.example.com
- Path = /abc123
- Concurrent connections = 1
- Certificate for TLS verification = Not set
- Logcat level = warning
- Generated line = path=/abc123;host=my.example.com;tls
- UDP Fallback = Disabled


Comments
Post a Comment